
This tutorial shows you how to sew the dress that Princess Charlotte wore for her fourth birthday in 2019!


Note:
- All seam allowances are 1cm unless otherwise stated.
- Pre-shrink machine washable fabrics: wash, dry and iron fabrics before sewing.
Sewing instructions:
1. Creating the collar.
If you are using a lightweight fabric, apply fusible interfacing to the wrong side of the two main collar pieces.

Place one set of main and lining collar pieces together with the right sides touching and the raw edges lining up. Sew along the outside curved edge. Trim close to the seam allowance without cutting the stitch line. Repeat for the other set of collar.
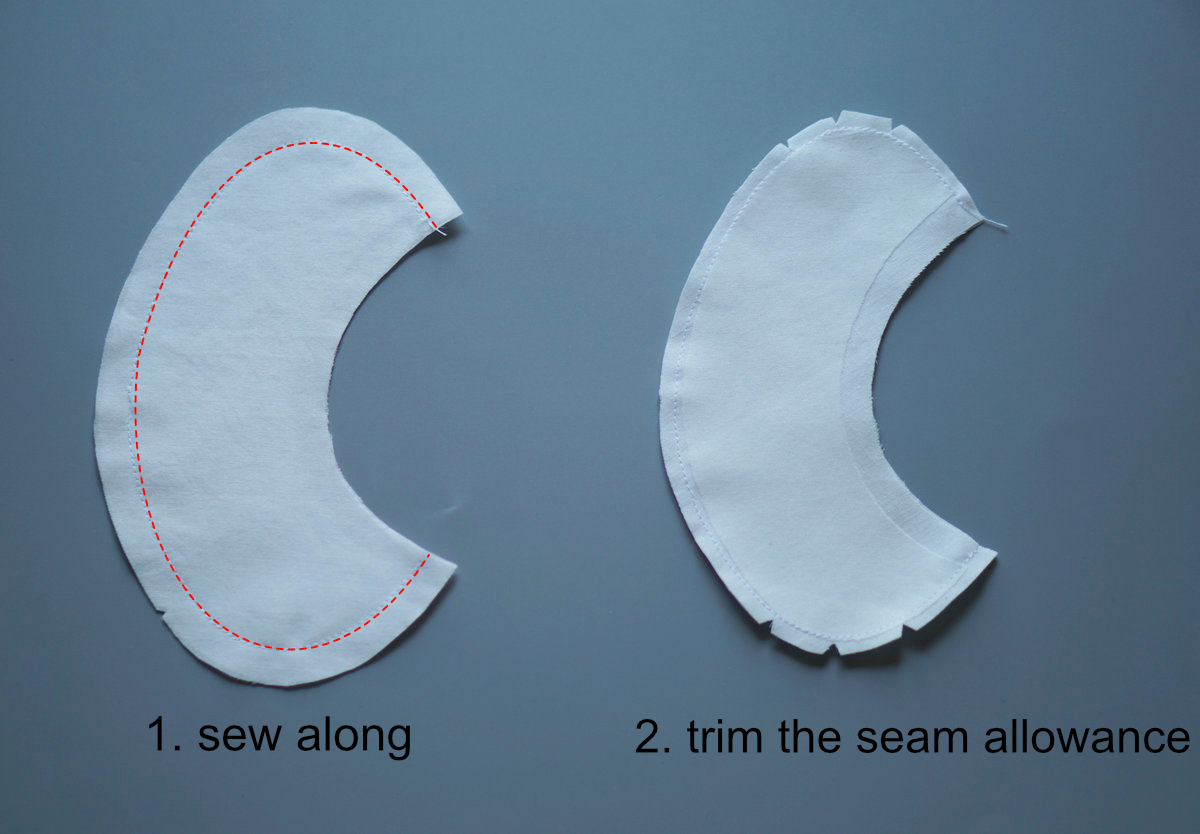
Turn the collar pieces right side out and iron flat. (Optional: sew a decorative line 0.7cm along the edge by hand if desired.) Set aside.


2. Making and applying the Piping.
Cut two piping cords or chunky yarn/twine which are slightly longer than the long side of the front bodice panel. Cut two bias strips with either the main fabric or a matching colour fabric. The width of the bias strip = the length of the cord. The length is around 2.5cm (depending on the thickness of your cord).
Take a length of bias strip (wrong side facing up) and place the cord down the centre of the strip. Fold the strip over and pin the raw edge length of the strip into place. Attach the zipper footto your sewing machine. Position the strip so that you are sewing directly to the left of the encased cord. (Don’t worry about getting completely up close to the cord, as you’ll be stitching it much snugger when you come to applying it to the bodice, and definitely won’t want these original stitches to show.)


Place one piping along the raw edge of the bodice front main (facing up), so that the encased cord is placed immediately above the seam line. Pin it in place or baste it if desired.

Lay over the front bodice panel with the wrong side facing up and the raw edges lining up. Now the piping is sandwiched in between. With the zipper foot in place, stitch the seam, getting nice and close to the piping, feeling your way as you go.


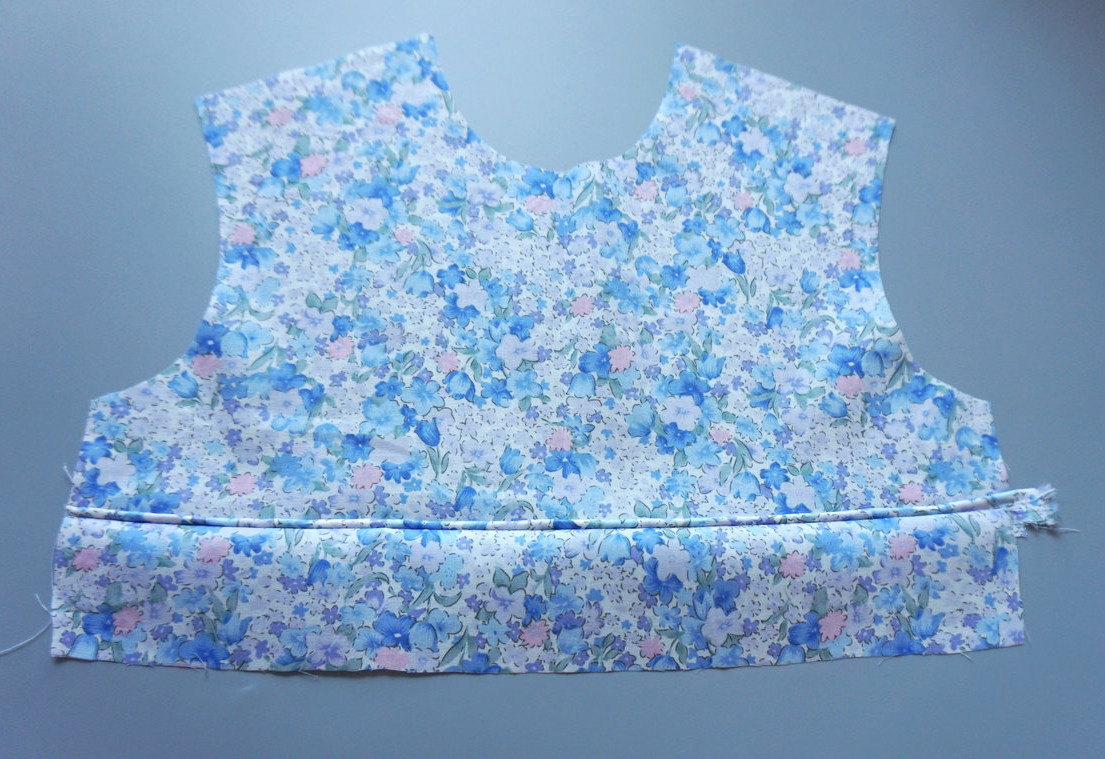
Place the other piping along the raw edge of the bodice waist panel (facing up), so that the encased cord is placed immediately above the seam line. Pin it in place and baste it in place.

3. Bodice.
Place the two bodice back main pieces on top of the bodice front main with the right sides touching and the raw edges lining up. Pin and sew along both shoulder seams. Iron the seams open. Repeat for the bodice front and back lining.


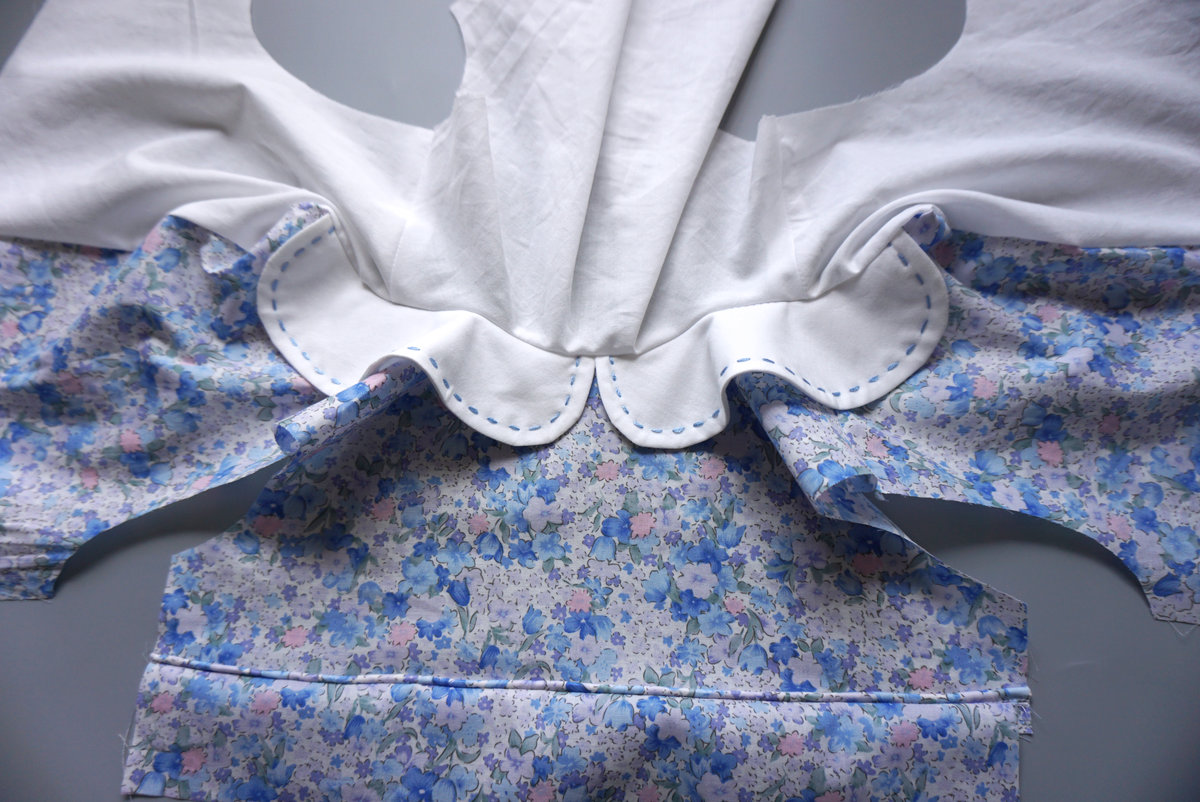
Place the collar pieces on top of the bodice main neckline. The wrong side of the collar should be touching the right side of the bodice main with the raw edges lining up. The front corners of the collars should meet at the front centre of the bodice and overlap slightly so that they just meet up at the centre of the finished neckline (i.e. 1cm below the raw edge of the neckline). The back corners of the collars should end 3cm from the bodice back centre raw edge. Pin and baste the collar to the bodice using a 0.6cm seam allowance.

Place the bodice front and back lining on top of the bodice main with the right sides touching and the raw edges lining up. The collar is sandwiched in between. Pin and sew along the centre back sides of the bodice and neckline. Trim off half of the seam allowance, clip the corners, and cut small triangle notches into the curved edges.


Under-stitch around the collar: lay the bodice main and lining out flat, with right sides up. Fold collar toward the front bodice, and the seam underneath towards the bodice lining.
Begin sewing at the start of the collar. The stitches will be on the lining side and 0.3cm away from the seam. Continue under-stitching until you reach the opposite end of the collar. Iron the seam flat.

4. Creating the sleeves.
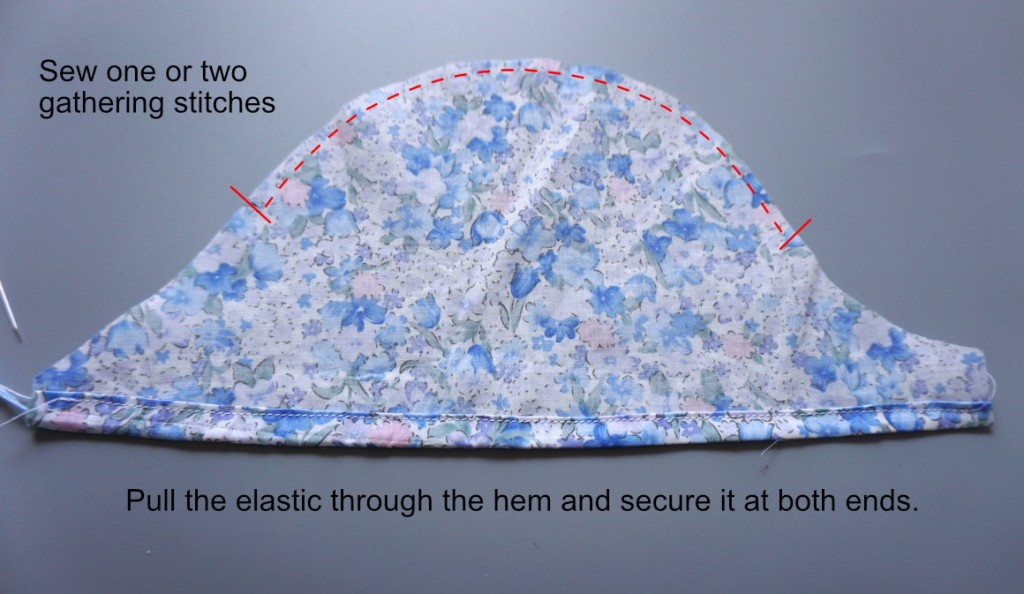
Turn the raw bottom edge of the sleeve piece up 0.5cm and iron flat. Then turn up another 0.7cm and iron flat. Sew right along the folded edge with 0.1cm seam allowance.
Pull the elastic through the hem of the sleeve and secure at both ends with a few stitches. (Or simply sew it directly on the wrong side of the bottom hem, stretching it to the same length of the hem with sewing.)
Sew one or two gathering stitches along the top of the sleeve in between the markings.
Lay the bodice flat with the right side facing up. Place the sleeve on top of the bodice with the right sides touching. Pin the sleeve to the armhole opening on each side working until you reach the gathering marks. Then pull the gathering thread(s) until the sleeve fits and finish pinning. (Note: you pin the sleeve to both the main and lining.) Sew the sleeve to the armhole along the pinned seam. Finish the seam with an overlocker.

5. The waist sash
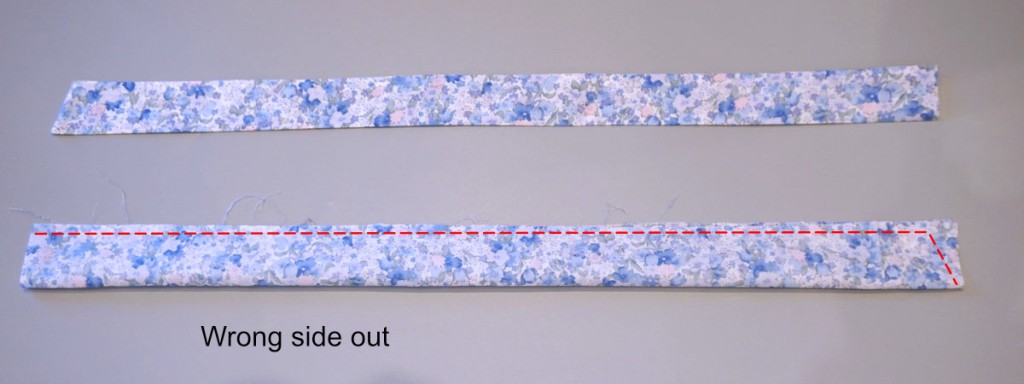
Fold one sash piece lengthwise with the right sides touching and the raw edges lining up. Pin and sew along the long raw edge and one short end, leaving the other short end open for turning. Trim off half of the seam allowance and clip the corner. Turn the sash right side out and iron flat. Repeat for the other sash piece.
Place one waist sash on top of the right side of the front bodice with the long seam of the sash aligned with the piping (i.e. 1cm above the bottom raw edge). Trim the short raw end of the sash to be aligned with the side edge of the bodice. Pin and baste the waist sash to the front bodice. Repeat with the other sash on the other side of the front bodice.

6. Finishing the bodice.
Pin the bodice front and bodice back together along the side seam with the right sides touching. Line up the armpit seams and pin. Then pin the raw edges of the sleeve together. Sew a continuous stitch along the pinned seam (notice: stop, lift the presser foot and turn at the armpit). Finish the seam with an overlocker. Repeat for the opposite sleeve and side seam.
Turn the bodice right side out and iron the seams flat.


7. Creating the skirt.
Place the two skirt pieces together with the right sides touching and raw edges lining up. Sew together along both short side seams. Finish the seam with an overlocker. Iron the seams flat.
Hem the bottom raw edge of the skirt: turn the raw edge 1cm up and iron. Then turn up another 1cm and iron. Sew closely along the folded edge.
8. Creating the placket.
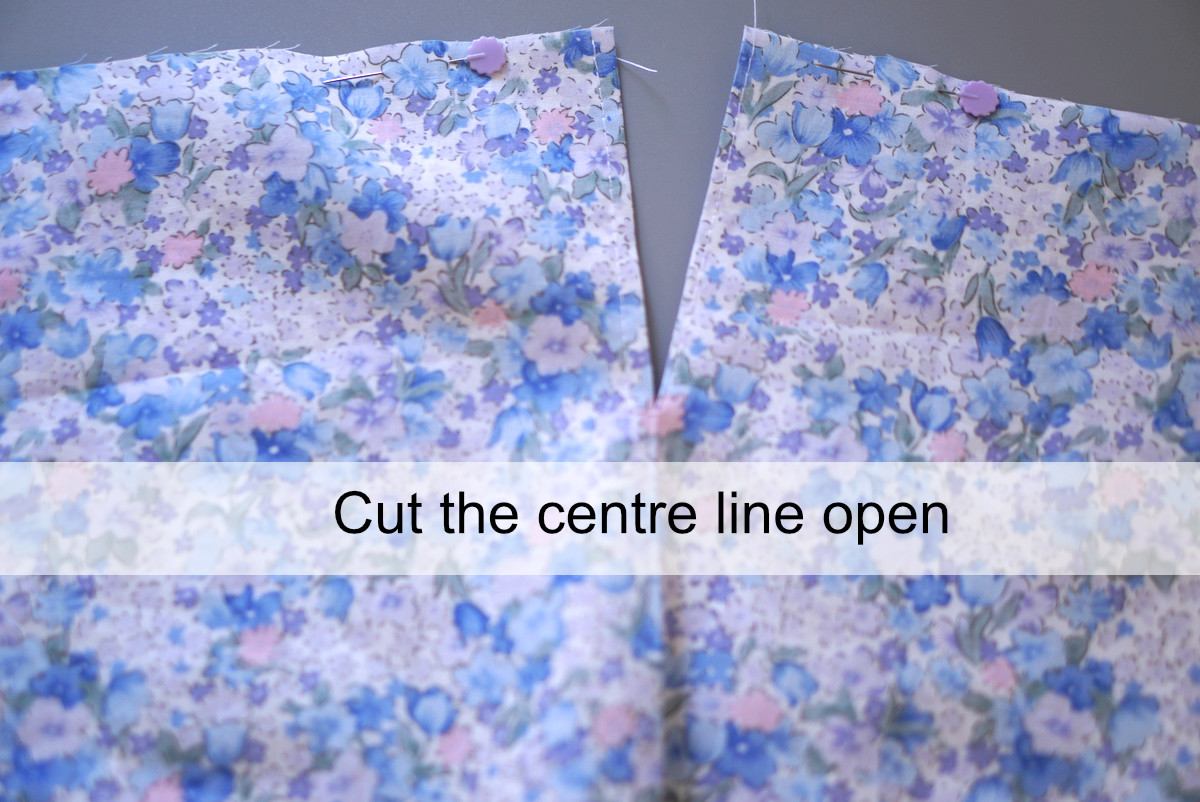
Lay the back skirt with the right side facing up. Find the middle of the raw edge of the back skirt, draw a vertical line of 6cm. Cut the line open. Open up the cut opening to form a straight edge across the cut.

(Note: if the fabric is lightweight, you might want to add a skirt lining with the same width but the length 5-6cm shorter than that of the main skirt pieces. In this case please follow the steps as shown in the photos below.)

Cut a 14cm*3.5cm rectangle placket piece on the main fabric. Pin the long edge of the placket piece along the newly cut edges. The right side of the placket should be touching the wrong side of the skirt back. Sew along the pins with a 0.3cm seam allowance. (Note: this will create a tiny pinch in the fabric in the middle of the opening. This will not be obvious in the finished dress.) Iron the seam allowance up towards the placket.


Pull the placket up and fold the open long raw edge down approx. 1cm and iron flat. Then fold it over again until it just covers the seam and iron flat. Pin and sew right along the folded edge.


Turn the placket down into the skirt. Iron the placket flat. The left side of the placket should be folded back to match up with the skirt. Baste it along the top edge to secure.The right side of the placket will extend past the skirt. Trim off the excess placket so that it is now aligned with the raw edge of the skirt.


Sew one or two rows of gathering stitches along the top raw edge of the skirt. (The placket should not be included in the gathering stitch.) Gather the skirt up with the exception of the placket until the skirt is the same width around as the bodice waist.
Place the bodice on top of the skirt with the right sides touching and pin together all the way around. Match up the side seams and front centres. The back middle finished edges of the bodice should be lined up with the finished placket edges. Pin to secure and sew along (Note: the piping is sandwiched in between. With the zipper foot in place, stitch the seam, getting nice and close to the piping, feeling your way as you go. ). Adjust the gathers when needed as you sew. For a professional look, finish the seam with an overlocker. Iron the seams up towards the bodice.

Sew 3-4 buttons and button holes on the back bodice (1cm from the edge). Congratulations! Your dress is now ready to be worn by the little Princess!
You can purchase the pattern following this link https://www.etsy.com/uk/listing/795111599/charlotte-dress-for-girl-baby-girl-6?ref=shop_home_feat_2


The dress is very cute! And you made a good tutorial of it!
LikeLike
Thank you very much for your kind words!
LikeLiked by 1 person
Loved making this dress. Learnt so much from the tutorial…..thanks
LikeLike
Love the dress made it in a bunny material. Enjoyed trying something new, from tutorial.
LikeLike
Could not have done this without your tutorial. Great help and dress looks lovely. Thank you
LikeLike
Enjoyed making this so much, I’m ready to make it again in a different fabric.
LikeLike